2022 UPDATE: I now use a simpler board (see here) or a Stablo.
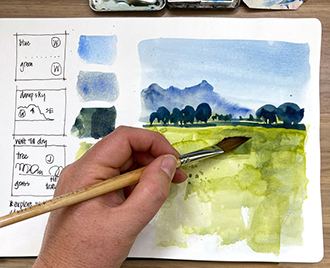
There are a few challenges when it comes to watercolour sketching out on location. A lot of people stress about being out in public and are afraid of what people will think of them. But once you get over that, the biggest issue is having your tools handy and being able to sketch in a variety of positions (seated or standing) with ease.
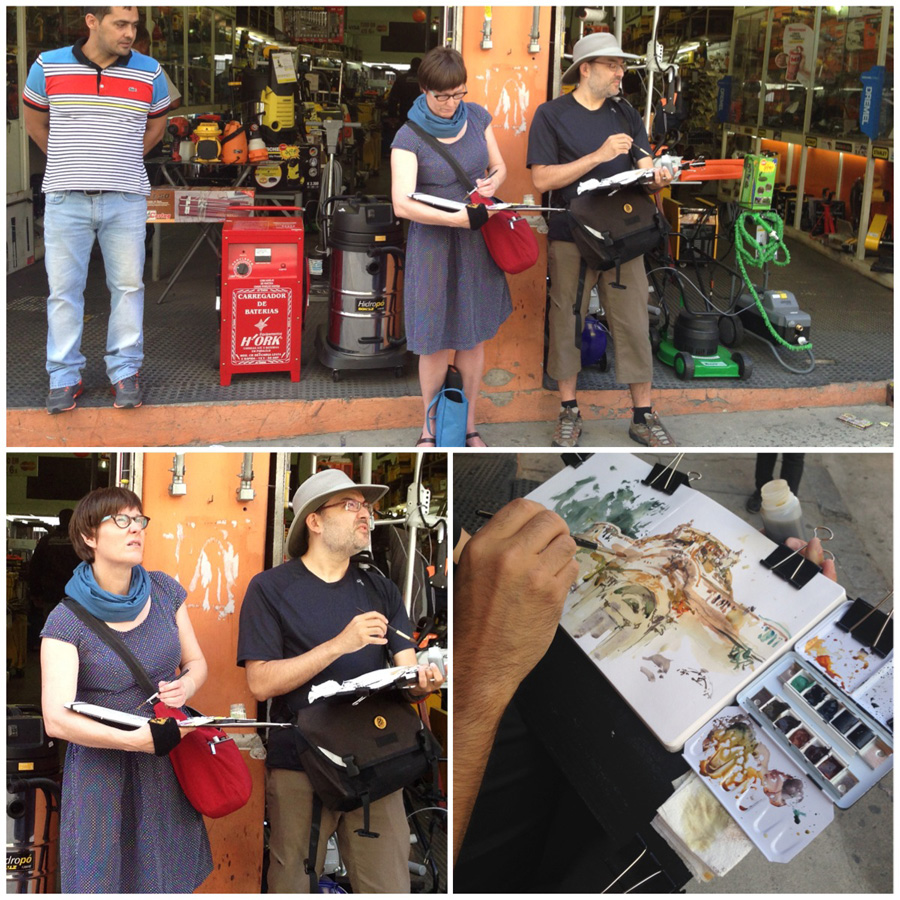
Two years ago I started using a board to support my sketchbook, paint tin and water container, and it has been a total game changer. I got this idea from Marc Taro Holmes after sketching alongside him for a few weeks in Brazil (August 2014). Everyday while I struggled to balance my gear (and particularly the large A4 moleskine) I watched Marc sketch in style and ease. You can read about Marc’s board here.
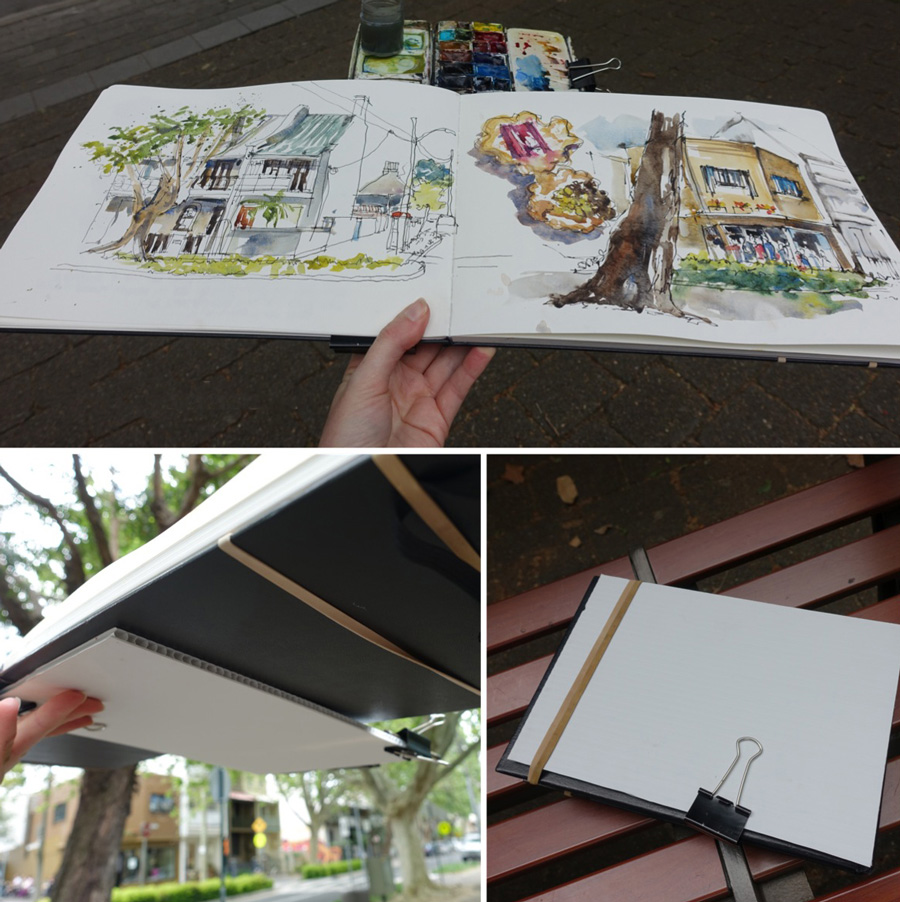
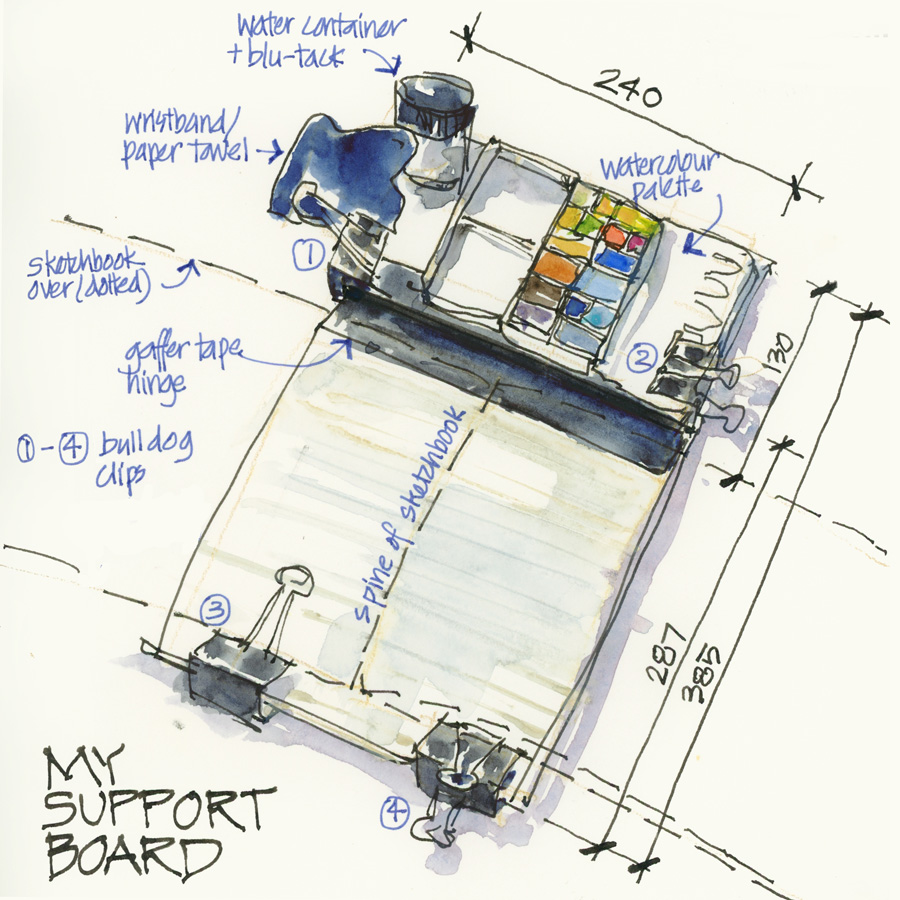
I knew I needed to set one up for myself but wanted mine to be a little smaller, so I did some experimentation. These photos show my first version which was the same size as my A4 moleskine. It was too small, so I added a hinged section and increased the width slightly – this has made a big difference.
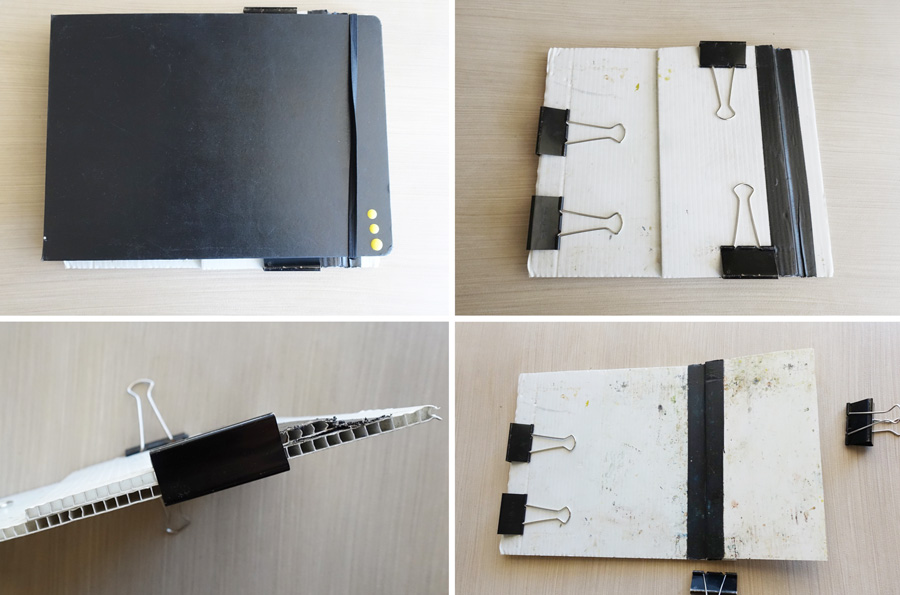
It is made from sig board/corflute/coroplast (please tell me if there’s another name for it) and gaffer tape (strong cloth-backed waterproof adhesive tape) for the hinge. Ideally I would prefer the board to be black, but the art store only had white at the time. However, the white makes it easier to see the hinged section, and also gives an idea of much I splash my paint. But, maybe it’s time to clean it!
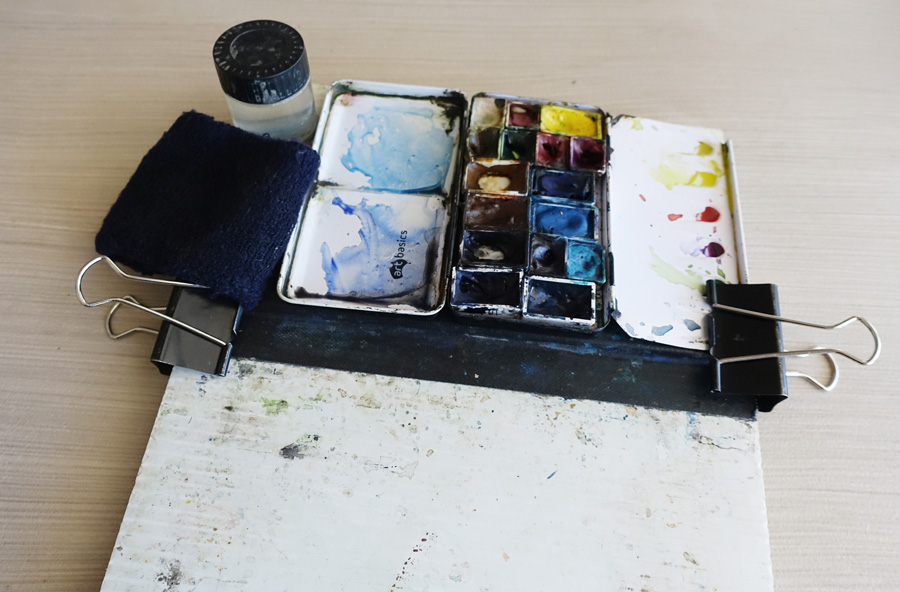
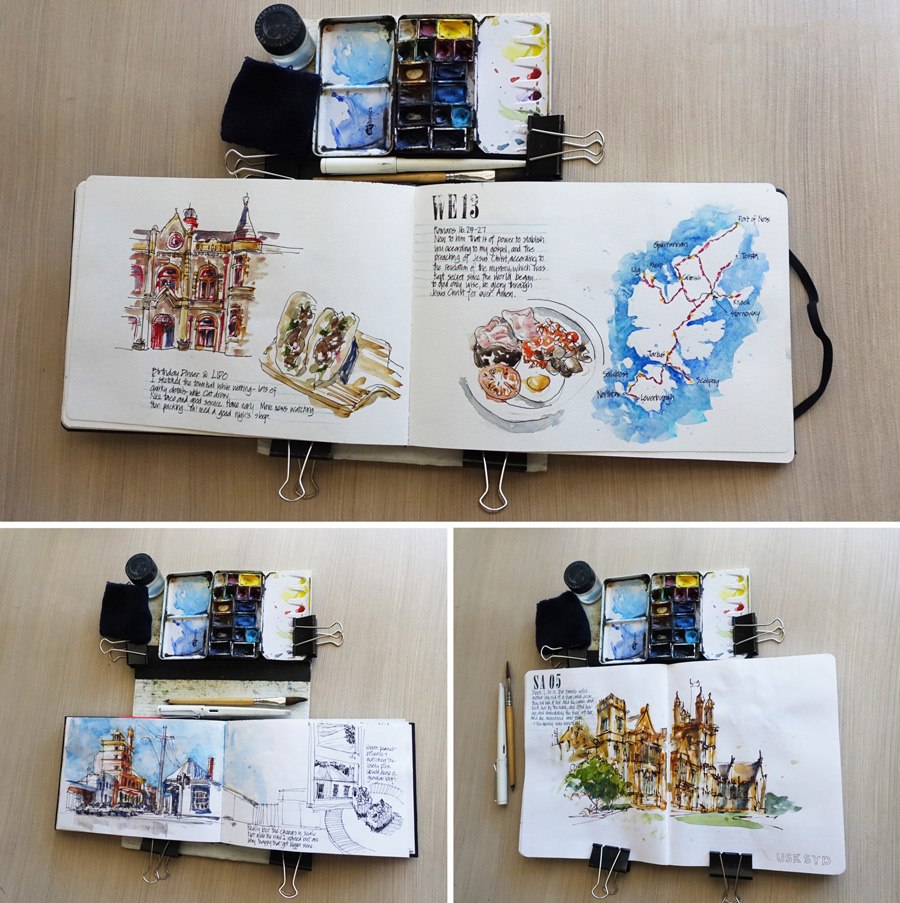
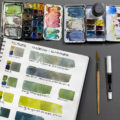
The width of the board has been designed to accommodate my metal palette and one (or two) water containers (secured with blu-tack) and some area for paper towel or my wristband. It also provides just enough support for the spine of my sketchbook which I clip to the board.
The length was based on an A4 moleskine with a little float, and it also amazingly fits the new 8 x 10 Stillman and Birn softcover book.
Dimensions:
Width 240mm (9.5″)
Main board = 287mm long (11.3″)
Hinged piece = 130mm (5.1″)
Total length 385mm (15.1″)
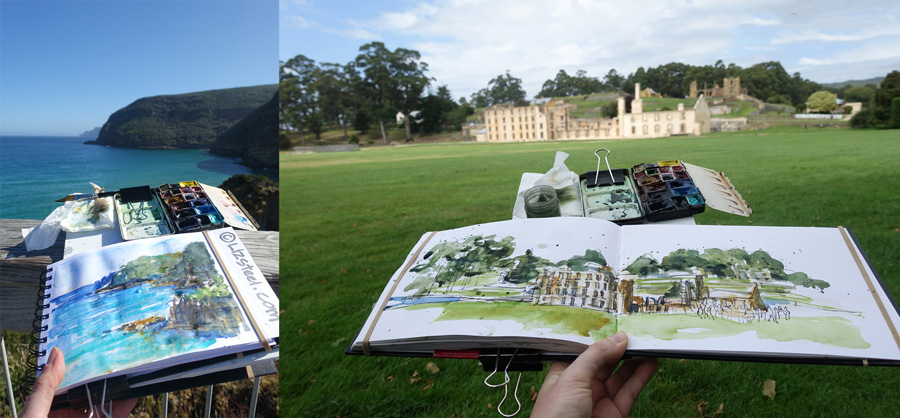
Having the spine of the book supported and my palette, water container and some paper towel all clipped together makes it very easy to use. No more awkward balancing one’s gear. It does take a little time to set up, so on big sketching days I often walk the streets with my book and palette still clipped to the board.
If you want to see the board in action, here is a video of my sketch of Haworth church the day I visited Rosemary & Co Brushes (I have shared this previously but you might want to check out my “standing setup” again). Watch here.
There are a lot of other very cool solutions by other urban sketchers. I think one of fun things about the Urban Sketchers Symposium is that we get to see how other people manage their gear. So I would love to hear from you if you have any clever solutions for holding your sketchbook and gear when out sketching.
UPDATE: Here is a great talk on Youtube with lots of great ideas: What’s In Your Pocket? A Juried Review of Cool Urban Sketching Gear – Mark Leibowitz
Learn the essential concepts and techniques for sketching on location – check out my 12 lesson course SketchingNow Foundations. The course has been designed specifically for people who want to start urban sketching!

48 Comments
ahahhhhh the hinge bit!!!! I have been playing with this sort of setup but it was always too unwieldy to fit in my bag etc. I will be trying this 🙂 thank you!
my pleasure- the hinge was a big deal for me too!
Wonderful to see you in action, not just the skeching but how you work with your materials. Tenplast is another name for the corrugated plastic board, which I use for drawing supports as well. I sling a small tool bag (6x8x3″) which has lots of slots and zippered sections to hold pens, brushes, watercolour tin and two sketchbooks. An elasticated pocket on the outside of the bag holds an open water jar. The watercolour box is clamped to the sketchbook itself. This is my most portable set up, it can be expanded to include a lightweight tripod (similar to Marc Taro Holmes but black) with a folding Tenplast pochade board with magnetic holders (inspired by James Gurney).
Thanks Glenn – sounds good. I used to used the other side of my book to support my palette, but having the spine supported has helped a lot.
In regards to the hinge, you don’t have to cut a separate piece and tape it. Coroplast scores and folds easily along it’s ribbed grain. I use a small knitting needle to make the score then fold it up against a hard edge like a metal ruler. Works great and doesn’t wear out.
Ah! brilliant and much more elegant solution. I actually like the little ledge as it provides a little space for my pen, brush
To make a board like yours with the step would require a piece of coroplast 613cm long with 2 folds. The first fold would be at the 385cm measure with the second fold 98cm past that to make a fold back support (and the edge of the step) upon which the remaining 130cm panel for the watercolour palette would sit on top of, and then be clamped down. Seen from the side the coroplast would make a “Z” type fold.
Hah! great to see those photos from Sao Paulo! That was a fun day. You have definitely improved my approach to sketching over they years. Just trying to keep up with you was an education in itself 🙂
the feeling is mutual!
Mark lebowitz used several of my hacks inthe urban sketchers presentation he made in Manchester last summer. I use coroplast as a palette, holding my paints ( I attach by imbedded magnets ) as well as water ( i cut a hole ) ( use urine sample containers for water; they never leak!) and a paper towel ( small clip).
Hi Suzala – thanks for your comment/idea and for the reminder to link to Mark’s talk on Youtube- just add the link!
Ah! That’s how it’s done.
I have tried to make one from your older post, but this post has made it so much clearer.
I used black foam core, very light weight. Might try your plastic material.
I have learned so much from your web site, blogs, and now vlogs.
You are such an inspiration for me to get out and do it!!
Thank you Liz!
Cheers,
John
Hi Liz, I copied your idea some time ago – using the black material. I noticed it was available at the St Leonard’s Eckersley”s store recently. If you get a chance to visit the current travel inspired exhibition at ME Artspace, you could check.
thanks Peter!
Hi Liz, thanks so much for this promised follow-up of my question a few weeks ago. Have put most of your previous ideas into action, now to add the all important hinge!
My pleasure Christine!
How do you hold the board? In the video I see it balanced on your right arm, but are you gripping it with your hand? I wonder what holds it steady. Also, does your supporting arm get tired?
Hi Sharon, most of the time I sit down so and prop the board on my bag which is on my nap. If I sketch standing up (as per that video) it will be a really quick sketch- 10 minutes max, so holding the board is bearable. But yes, it can get heavy and my arm can get sore. I was VERY uncomfortable while sketching in Brazil as per the top photo
Hi LIz,
Interesting to see your set up and thanks for the Urban Sketchers presentation link. I’m a Rural Sketcher so need very light kit as I’m walking though the hills or climbing over rocks ! I made a hinged support from the boards on the back of spiral watercolour pads, by cutting two rectangles slightly smaller than my soft-cover sketch book and glueing them onto plastic coated fabric (a bit like covering a book) leaving an area of fabric between the two boards, to create a hinge. Then glue another rectangle on top so that it’s all waterproof and the double thickness in the hinge is strong. Lay the sketchbook on top and slide it down so that about 2 inches projects at the top. Clip the left-hand pages of the sketchbook to the stiff cover underneath. Onto the ledge you’ve created at the top clip a large oil-painting dipper, sprayed white with appliance enamel, so you can see the water getting dirty ! These dippers come with a built in clip. If you position it at the hinge, it holds the hinge open and flat. Because of the plastic surface of the stiff cover, it doesn’t slip around on your supporting hand.
For my paint, I have bought a metal Prang paintbox from USA on Etsy (idea from Cathy Johnson) and it’s narrow rectangular shape will sit easily on the ‘ledge’. If you use a little strip of silicone non-slip mat, it won’t move when you’re painting. I removed all the old pans from the box and put in my own full and half pans – no need for magnets or blue tac, just glue them in with Copydex (or any rubber solution glue). When it’s dry it holds them securely, but if you want to make changes, just pull them out, pull off the old glue (it comes off easily in rubbery strings) and reglue – easy.
Hi Fiona – thanks so much for sharing. Great tips
Hi Liz,
I have been using a hinged board set up like yours for about a month and I really like it. I have modified one thing. Instead of using a clip to secure my paint tin, I cut a small slit in the plastic sign board to accommodate the thumb ring of my schminke palette. I position the ring so it is perpendicular to the palette and push it through the slit. It stays in place and one less clip to fiddle with.
Hi Jan – that is a brilliant idea about the slit as I find the clips annoying. I might have to test that out for myself. Thanks for sharing
Hi Jan. Would it be possible for you to post a photo of it (a link to a photo). I have some difficulty to understand your description.
I loved this video. As beginner it was so helpful to see you work in real life! Of course the speed was amazing (and the end product), but how you stood, how equipment was aligned, the use of pen and brush……. I could go on and on. Thanks for this!
thanks Kellie – I am glad you enjoyed it.
There is a product I bought a while ago for my iPad Pro that works perfectly to hold open a hardback sketchbook with no clips or other inconveniences. Check out http://www.laptopdesk.net/gripzilla-pro-handle-stand.html. The best part is that you don’t even have to hold on to anything as the “handle” part just slips over your hand and makes it very easy to control and move the sketchbook around. I slip a piece of coroplasta between the Gripzilla and the sketchbook and it stays in snug enough to hold my water color palette, water, sponge, etc. I attach to The open edges of my SketchBook as opposed to down the spine and it works perfectly, even holding the sketchbook perfectly flat.
Brilliant. Thanks so much for sharing!!!!
OK, so now I’ve decided that I really like your idea of the 8×10 S&B Alpha soft cover but of course my gripzilla rig won’t work with that book. I have a 9 inch grafiti band (https://www.amazon.com/Wrapping-Exercise-MacBooks-Replacements-Silicone/dp/B00H1ERHDQ/ref=sr_1_2?ie=UTF8&qid=1488494325&sr=8-2&keywords=grifiti+bands) that I use to mark my place in the book and guess what… It also can be used to hold a support board (sticking out the side rather than the top of the book) and it serves as a no-grip handle as well. The band will strap over part of the page but so far I find that’s not a problem since it’s thin and I can easily move it around depending the type of spread I’m doing (I usually keep it either against the spine or at an edge). Again no clips, etc (I cut a slot in my coroplast to hold my palette by its ring and use a magnet for my water bottle). I think what I like best about both rigs is the no-grip aspect of them — reduces hand fatigue to almost nothing.
Hi Carolanne- It may be too late to send a follow-up question on the gripzilla but I’ll give it a try. I love the idea but worry about the tension caused by attaching the gripzilla. Does it buckle the coroplast or cause the hinge to collapse?
Liz, this was a JOY to watch. You bounced me back into stopping in time! I love your spontaneous technique. Thanks so, so much!
I wondered if the 4mm Coroplast I found would be stiff enough (it is at moderate temperatures at least). Marc said it could become too flexible in hot weather, which we have in abundance around here. So I fastened a 5-cm piece of Coroplast onto the back of the board; the brace has the ribs running at right angles to those on the main piece. Very stiff! It seems many adhesives do not work well on Coroplast; I used “Uglu” tape, which is the very devil to work with until you get the hang of it, but it sure does work. (Hint: get a piece of the slippery paper backing and put it over the sticky tape side before cutting with *sharp* scissors.)
Liz, in your video at Haworth you talk about your Rosemary & Co dagger brush and how much you love it. Would you please share why you love it so? It sounds as though you consider it the “do everything” for your on location painting. I’ve never used a dagger so I’d love to know about it. Thanks!
Hi Amy, please go to sketching tools – brushes and you will see an article on swords and daggers
Hello,
this is great – i would suggest using some magnetic strips, glued onto the top “flap”, where you put the watercolor box. I prefer this solution to using clips, as i sometimes just made my color snap up and fall of to the ground when i tried to apply only 1 clip.
All the best!
I am not clear on the point of the hinged section. Can you please clarify? Thanks!
Hi Nancy – it’s so the board can fit into my page when the top section is folded back.
Coroplast is a trade name for Corrugated plastic sheet made in many colours and thicknesses. … In other parts of the world other trade names might be better known. Examples are Plaskolite, Corplast, Coroboard, Corruboard, Polyflute, Intepro, Correx, Twinplast, Impraboard, Alylux, Akylux, vikuprop are other tradenames.
Thanks for sharing those names Terry!
In Holland it’s called: polycarbonate
Sorry to necro a thread, but I believe we’re talking two different materials Frieda. Because I wouldn’t want people to go out and buy the wrong product, I’m going to clarify the difference a bit for future readers…
Polycarbonate is an actual type of plastic material, used to make windows, fish tank lids, car headlamps, and the specific product you may be thinking of: Plaskolite corrugated plastic. The product Liz is using is Coroplast (or any of several other names it goes by), which is basically a cheaper, lighter, more flexible corrugated plastic made of polypropylene (PP) instead of the stiffer polycarbonate (PC). They look similar in that they are built like corrugated cardboard, but PC is generally clear and quite stiff, and PP is opaque and gets a bit flimsy in hot weather (it also shouldn’t be glued, but heat-welded instead). We used to use Coroplast a lot for lawn signs (I worked at a screen print shop many years ago), as it was a pretty cheap product yet held up in rain, snow and sun.
Someone above mentioned cutting a slit in a piece of Coroplast to make a hinge instead of the gaffers tape Liz used. PC plastic will snap if bent on a scored line. Polypropylene is one of a few plastics used for “living hinges”, and will not break along the score line easily. That’s why it’s used for lids on shampoo and ketchup/mustard bottles; it can take thousands of bending actions easily.
Plaskolite – made of polycarbonate (PC) plastic, stiff, usually clear, more expensive
Coroplast – made of polypropylene plastic, more flexible, can be purchased in many colors (but is opaque), cheap
Plaskolite would make a much stiffer board, for sure, but more expensive, and a bit heavier, may chip or break if dropped. That said… you did give me an idea… 🙂
I use industrial version of velcro on my paint tin and the two well water container they use for oils that has a clip that slides on. Love the sketch and love the part where you said “Okay I am bored now” that is awesome
Thanks for sharing Astrid. I should try velcro one day! 🙂
I read your interesting item on the board to:balance all your watercolour kit for en plain air. I can’t find coroplast in the uk, but found foam board. Unfortunately it’s not waterproof or that durable. However, I had the backing board from a used pad of 1/4 imperial watercolour paper, and found half of this, cut in half vertically, joined by gaffer tape was a good strong if not waterproof alternative. And it’s free as you would often throw this away. It lasted a holiday, and I could make two from one sheet. The idea though was from your Brazilian trip, so thank you. Thinking outside the box!
Thanks for sharing Granville!
NEWSLETTER
Subscribe for first notification of workshop + online classes and more.